Microsoft Authentication in a Vue.js Single-Page Applications
How to configure Microsoft Authentication on a Vue.js Single Page Application (SPA)

Summary
I have literally lost the best part of two evenings trying to get Microsoft Authentication working on a new Vue JS frontend app so I’m documenting it here… I did managed to get it working previously and I remember it being so easy but I really had some issues this time which knocked my confidence.
It actually turned out to be a bug in the latest version of the msal-browser library… Instead of closing the popup window it was redirecting to the app in this tiny popup box… Once I downgraded to v4.13.0 it worked. But I still wanted to document this as there isn’t much on the internet about how to set this up specifically for Vue.js.
Prerequisites
- An Entra App Registration
- A Vue.js App with the following libraries:
- pinia
- vue-router
I personally used the default Vuetify template (npm create vuetify) and choose the full package which automatically installs the Vue-Router and Pinia library in addition to some other libraries that aren’t used (MCP and i18n).
Configuring Entra
Note: This is only the front end so you will need a backend for your API calls. I’d recommend following the Entra steps in Microsoft Authentication In C# Web APIs first, even if you are not using C# as your backend
In your Entra App Registration:
- Navigate to the “Authentication” tab, add a “Single-page application” Redirect URI and enter the url:

- Sill under “Authentication”, select the “Supported accounts” tab and choose the correct option:
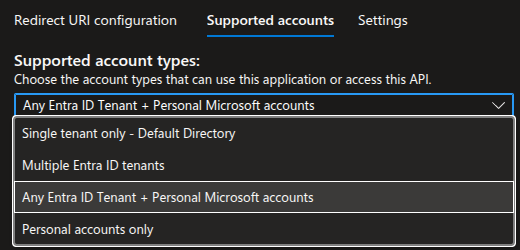 I use “Any Entra ID Tenant + Personal Microsoft accounts”
Note: If you receive an error “Error detail: Property api.requestedAccessTokenVersion is invalid.”, go to the “Manifest” page, and change “requestedAccessTokenVersion” to the value “2”, save, then try again
Env File
First create an .env file with the following details completed from Entra:
1
2
VITE_CLIENTID=TODO
VITE_TENANTID=TODO
The Code
Quick Summary
We are about to
- Add the msal-browser library to the project
- Create a Pinia store to store the user details and their auth token
- Update the router so if user doesn’t yet have an auth token, it redirects them to the
/loginpage - Create a
/loginpage - Update
HelloWorld.vueso when the user is logged in, it prints their name (so we can see it’s working)
Installing the Libraries
In the CLI, install the library: npm install @azure/msal-browser@4.13.0
Note: We are specifically using 4.13.0 because the latest version at the time of writing seems to be broken.
Configuring the Auth Store
Under /src/stores/ create auth.ts and add the following:
1
2
3
4
5
6
7
8
9
10
11
12
13
14
15
16
17
18
19
20
21
import { PublicClientApplication, type AccountInfo } from "@azure/msal-browser";
import { reactive } from "vue";

const config = {
  auth: {
    clientId: import.meta.env.VITE_CLIENTID,
    authority: "https://login.microsoftonline.com/common",
    redirectUri: `${window.location.origin}`
  },
};

const data = reactive({
  account: null as AccountInfo | null,
  msalInstance: new PublicClientApplication(config),
  token: "",
});

export function useAuth() {
  return data;
}
Configuring the Router
We need to update /src/router/index.ts so it checks to see if the user has a token. If it doesn’t, it sends them to /login:
1
2
3
4
5
6
7
8
9
10
11
12
13
14
15
16
17
18
19
20
21
22
23
24
25
26
27
28
29
import { createRouter, createWebHistory } from 'vue-router'
import Index from '@/pages/index.vue'
import Login from '@/pages/login.vue'
import { useAuth } from '@/stores/auth';

const auth = useAuth();

const router = createRouter({
  history: createWebHistory(import.meta.env.BASE_URL),
  routes: [
    {
      path: '/',
      component: Index,
    },
    {
      path: '/login',
      component: Login,
    },
  ],
})

router.beforeEach(async (to) => {
  if (!auth.token && to.path !== "/login") {
    return { path: "/login" };
  }
});


export default router
Configuring the Login Page
Now we need to create a login page at /src/pages/login.vue, the below example just has the name of the app and a button to sign in with Microsoft. The key thing here is what it does when the button is pushed:
1
2
3
4
5
6
7
8
9
10
11
12
13
14
15
16
17
18
19
20
21
22
23
24
25
26
27
28
29
30
31
32
33
34
35
36
37
38
39
40
41
42
43
44
45
46
47
48
49
50
51
52
53
54
55
56
57
58
59
60
61
62
63
64
65
66
67
<template>
  <div
    style="
      height: 100vh;
      display: flex;
      justify-content: center;
      align-items: center;
    "
  >
    <v-card
      style="
        height: 350px;
        width: 300px;
        display: flex;
        flex-direction: column;
        align-items: center;
        justify-content: center;
      "
    >
      <h1 style="margin-bottom: 100px">App Name</h1>
      <v-btn
        style="margin-bottom: 30px"
        color="green"
        variant="tonal"
        @click="login"
        >Sign In with Microsoft</v-btn
      >
    </v-card>
  </div>
</template>

<script setup lang="ts">

import router from "@/router";
import { useAuth } from "@/stores/auth";
const auth = useAuth();
const loginRequest = {
  scopes: [
    `api://${import.meta.env.VITE_CLIENTID}/BackendApi`,
    "openid",
    "profile",
    "offline_access",
  ],
};

async function login() {
 try {
    await auth.msalInstance.initialize();

    const loginResponse = await auth.msalInstance.loginPopup({
      ...loginRequest,
    });

    auth.account = loginResponse.account;

    const response = await auth.msalInstance.acquireTokenSilent({
      ...loginRequest,
      account: auth.account,
    });

    auth.token = response.accessToken;
    router.push("/")
  } catch (e) {
    console.error("MSAL popup failed:", e);
  }
}
</script>
Updating HelloWorld.vue
As HelloWorld.vue is the main landing page, I like to update it so I can see the user name when authenticated just as an easy test to show things it has been able to authenticate successfully and retrieve my account details:

1
2
3
4
5
6
7
8
9
10
11
12
13
14
15
16
17
18
19
20
21
22
23
24
25
26
27
28
29
30
31
32
33
34
35
36
37
38
39
40
41
42
43
44
45
46
47
48
49
50
51
52
53
54
55
56
57
58
59
60
61
62
63
64
65
66
67
68
69
70
71
72
73
74
75
76
77
78
79
80
81
82
83
84
85
86
87
88
89
90
91
92
93
94
95
96
97
98
99
100
101
<template>
  <v-container class="fill-height d-flex flex-column justify-center" max-width="1100">
    <div>
      <v-img
        class="mb-4 font-weight-bold"
        height="150"
        src="@/assets/logo.png"
      />

      <div class="mb-8 text-center">
        <div class="text-body-medium font-weight-light mb-n1">Welcome to</div>
        <div class="text-display-medium font-weight-bold">Vuetify</div>

        <div v-if="auth.token !== ''">{{ auth.account?.name }}</div>

      </div>

      <v-row>
        <v-col cols="12">
          <v-card
            class="py-4"
            color="surface-variant"
            image="https://cdn.vuetifyjs.com/docs/images/one/create/feature.png"
            rounded="lg"
            variant="tonal"
          >
            <template #prepend>
              <v-avatar class="ml-2 mr-4" icon="mdi-rocket-launch-outline" size="60" variant="tonal" />
            </template>

            <template #image>
              <v-img position="top right" />
            </template>

            <template #title>
              <div class="my-title my-uppercase text-headline-medium font-weight-bold">Get started</div>
            </template>

            <template #subtitle>
              <div class="text-body-large">
                Change this page by updating <v-kbd></v-kbd> in <v-kbd>components/HelloWorld.vue</v-kbd>.
              </div>
            </template>
          </v-card>
        </v-col>

        <v-col v-for="link in links" :key="link.href" cols="6">
          <v-card
            append-icon="mdi-open-in-new"
            class="py-4"
            color="surface-variant"
            :href="link.href"
            rel="noopener noreferrer"
            rounded="lg"
            :subtitle="link.subtitle"
            target="_blank"
            :title="link.title"
            variant="tonal"
          >
            <template #prepend>
              <v-avatar class="ml-2 mr-4" :icon="link.icon" size="60" variant="tonal" />
            </template>
          </v-card>
        </v-col>
      </v-row>
    </div>
  </v-container>
</template>

<script setup lang="ts">
  import { useAuth } from '@/stores/auth';

  const auth = useAuth()

  const links = [
    {
      href: 'https://vuetifyjs.com/',
      icon: 'mdi-text-box-outline',
      subtitle: 'Learn about all things Vuetify in our documentation.',
      title: 'Documentation',
    },
    {
      href: 'https://vuetifyjs.com/introduction/why-vuetify/#feature-guides',
      icon: 'mdi-star-circle-outline',
      subtitle: 'Explore available framework Features.',
      title: 'Features',
    },
    {
      href: 'https://vuetifyjs.com/components/all',
      icon: 'mdi-widgets-outline',
      subtitle: 'Discover components in the API Explorer.',
      title: 'Components',
    },
    {
      href: 'https://discord.vuetifyjs.com',
      icon: 'mdi-account-group-outline',
      subtitle: 'Connect with Vuetify developers.',
      title: 'Community',
    },
  ]
</script>
Notes
After this you can add your auth token from the auth store to your API Calls. As your backend should be configured to trust the same app registration in Entra it should accept the calls you are making.
I like to use Axios for the API calls, it’s very simple to use.
Also, if you want to retrieve more details for the user you can add an API call on the login page before the router.push("/") line. For example, in my Finance Budgeting App, the first thing we do is retrieve a list of bank accounts and balances before we even redirect back to the home page.